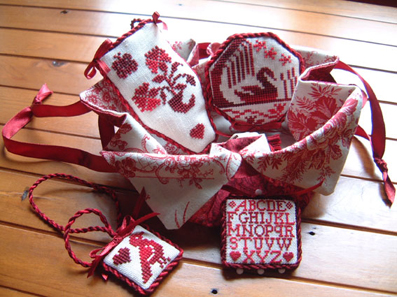
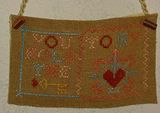
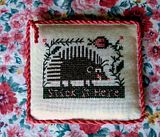
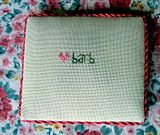
I thought I'd share the bourse I made following Isabelle's lovely instructions. Although it was easy I don't know if I'd have tried it without them - so thank you Isabelle!
I filled it with Quaker needlework smalls as a gift for a friend. I was sad to see it leave home!
Posted by Nicki
Thursday, June 28, 2007
Wednesday, June 27, 2007
Gallery - Finally - my Bourse
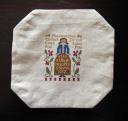
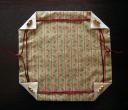
I finally had the time AND the right fabric to finish my Bourse!
The stitched piece is The Sampler Lady by Little House Needlework. It was a joy to stitch.
And once I had the right fabric, finishing the B
The stitched piece is The Sampler Lady by Little House Needlework. It was a joy to stitch.
And once I had the right fabric, finishing the B
Tuesday, June 26, 2007
Gallery - Anne D's no-sew wallhanging
I'm posting this for Anne as she's had problems with resizing the photo:
Posted by Anne D

Posted by Anne D
Monday, June 25, 2007
Seen around blogland
I've seen a couple of finishes on blogs where the stitchers have used the class tutorials available here, so I thought I'd share:
Goldie's cute bourse (class instructions here)
Annie's tie-on pillow (class instructions here)
If you've seen any finishes (or done one of your own) using any of the class tutorials on the blog, please feel free to post them here so we can all admire them :)
Posted by KarenV
Goldie's cute bourse (class instructions here)
Annie's tie-on pillow (class instructions here)
If you've seen any finishes (or done one of your own) using any of the class tutorials on the blog, please feel free to post them here so we can all admire them :)
Posted by KarenV
Friday, June 15, 2007
No Sew Wallhanging Class
Hello :) thank-you with a very warm welcome to everyone who wants to take part in this class or to bookmark it for future reference :)
I am sure you are going to really enjoy this so very easy but very effective finish. Remember your list of materials/tools was here...just so that you can check you have everything with you ;) Good, now all we need is to have some good fun, a bit of time, lots of patience and an ability to use an iron.
I am posting the step by step instructions below split into the work order sections accompanied by lots of photos to guide you through this simple style of finish please read through before plugging the iron in ;)
NB. I know...caught out, tut tut naughty me ;-) that you can see the thread dragged between the smyrna snowflakes floating in the sky on my reverse, but honestly this linen is as thick as sack cloth, I thought I could cheat and get away with it with this linen... totally forgetting this was going to be seen by the world!! So please excuse and overlook my tardiness on this occasion.. however on the plus side...lol...they will stay put, nice and secure over time and they do look alot worse on these pics!
Without further more ado on we go... just remember have fun and enjoy your creation!!
Step 1. Press with iron the whole reverse side of stitched piece so it is nice and flat. Now remember our 2 inch/5cm allowance all around the design we are now going to 'finger' press after measuring the top and bottom a 1 inch (2.5cm) turnover to wrong side of stitched piece. It will turn into exactly the outer edge of the outline border crosses, it should look like this below.
Step 2. Do the same for the 2 sides remembering we are working on the reverse side all the time.
Step 3. Now press it into place on the reverse side, remember ;)
Step 4. Cut Iron On Vilene/fusible Interfacing to exact size of the now ironed stitched piece.
Step 5. On REVERSE side shown above now iron vilene/interfacing on as per manufacturers instructions to fuse to the back of stitched piece.
Step 6. We now start the backing fabric measure and fold sides in like this by 'finger' pressing.
Step 7. Try the stitched design on top for size, like this below, measure distances accurately, remove stitched piece then iron backing fabric into place. (Use steam setting if you have it to get really sharp lines)
Step 8. Making sure after measuring that the stitched piece is correctly centred, hold into place with a couple of pins pushed in vertically. We are now going to turn the top over like this, measuring to use about one third of the fabric for the 1 st turnover then 'finger' press into place like so...
Step 9. We are now going to use another third and turn the top over again making sure it sits over the top of the stitched piece like so
Step 10. Now we know everything is lined up properly, press it into place being careful not to iron over your stitching.
Step 11. We now do exactly the same for the bottom section following steps 8 to 10 above. It will now look like this below.
Step 12. If your prepared stitched piece is quite light you may not need to do this step. Mine was a very thick heavy linen and the backing fabric needed more strength to hold it firm. Judge yourself if there seems a big weight difference in the 2 prepared sections. If yours does need strengthening to keep it firm we are now going to repeat Step 4 for the iron on Vilene/fusible interfacing to be exact size of now ironed backing fabric piece. This time though we will open up the ironed backing fabric , line up the Vilene/Interfacing within the ironed outline and again as per manufacturers instructions iron it into place on WRONG side BEING VERY CAREFUL NOT TO PRESS OUT YOUR CAREFULLY IRONED IN LINES. The backing fabric now looks like this below once you have folded in the top, bottom and sides again.
Step 13. Take your length of cording and knot a loop in it a little way along. This will form the hanger, centre it in the middle top then take the remaining cording round snugly to fit in under the flap.
Step 14. Do the same with the other side of cording long length. Once in position cut it off from the main long length, leaving it just slightly longer than exact. If you untwist a small bit of the cording you can take a little section to make a small knot to hold it when it hangs with the weight from it. (Only use a little bit of cording from each side to knot, or it will be too bulky). Those of you who can/want to sew, can oversew the pieces of cording together. I tried doing nothing but it just fell out of mine with the weight once I hung it up :/
OR: Maybe a better way?...You can always do it way of the bottom instruction below (Step 15) but leave the ends long enough to knot at the top to form the hanger.
Step 15. We are going to do the bottom now but the other way around by placing the cording under the flap first then bringing it around to the bottom of the fabric.
Step 16. Tie at the bottom in a knot, it will have maybe untwisted a bit itself. No worries, we will come to that later :)
Step 17. We are on the last leg now of fixing it all together, all the careful preparation will pay off :) We are now going to cut the strips of Iron on Wonderweb / Fusible web / Hemming Tape. Very carefully and accurately cut the strips the exact length and width of the sides of the STITCHED piece as shown here. So you end up with 4 pieces clockwise all round the edge...one each side and top & bottom.
Step 18. Very carefully to make sure all the web / tape is accuarately lined up turn it all over and place it on the top of the backing piece. Once correctly centred vertically pin it into place to hold...the big moment is coming up as you will now follow the manufacturers instructions and fuse it into place with your iron :) It will now look like this below.
Step 19. This is the last step and we are going to fuse the overlap flap with the web / tape to form a sealed casing. Again cut the strips exactly the right width, of the flap this time. Make sure the cording is correctly in place top and bottom then push the flap down/up repectively and iron again as per manufacturers instructions. This will attach the top and bottom sections to the stitched piece . Separate to unravel the bottom ends of the twisted cording to form a tassel, trim if necessary to make it look neater.
Those of you who can or like to sew can of course do so invisibly right round the whole edges.
Which ever way you prefer VOILA we have our finished wallhanging :)
I hope you have understood and enjoyed my class for you all, if you take part and finish one please post a picture to the blog as remember this is a communal blog , here for us all to enjoy. You will need to register for a Wordpress account which really only means register a user name and your email, then email Karen for the invite link to join so you can post, it is as easy as that :)
Tutor = Helen
I am sure you are going to really enjoy this so very easy but very effective finish. Remember your list of materials/tools was here...just so that you can check you have everything with you ;) Good, now all we need is to have some good fun, a bit of time, lots of patience and an ability to use an iron.
I am posting the step by step instructions below split into the work order sections accompanied by lots of photos to guide you through this simple style of finish please read through before plugging the iron in ;)
NB. I know...caught out, tut tut naughty me ;-) that you can see the thread dragged between the smyrna snowflakes floating in the sky on my reverse, but honestly this linen is as thick as sack cloth, I thought I could cheat and get away with it with this linen... totally forgetting this was going to be seen by the world!! So please excuse and overlook my tardiness on this occasion.. however on the plus side...lol...they will stay put, nice and secure over time and they do look alot worse on these pics!
Without further more ado on we go... just remember have fun and enjoy your creation!!
Section 1
PREPARING THE STITCHED SECTION
Step 1. Press with iron the whole reverse side of stitched piece so it is nice and flat. Now remember our 2 inch/5cm allowance all around the design we are now going to 'finger' press after measuring the top and bottom a 1 inch (2.5cm) turnover to wrong side of stitched piece. It will turn into exactly the outer edge of the outline border crosses, it should look like this below.
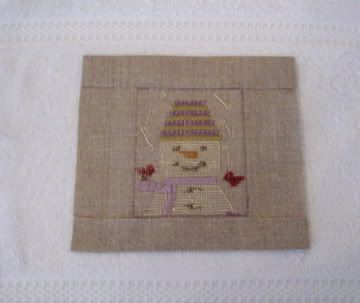
Step 2. Do the same for the 2 sides remembering we are working on the reverse side all the time.
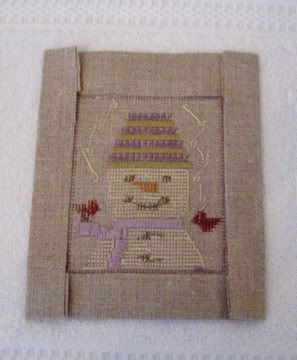
Step 3. Now press it into place on the reverse side, remember ;)
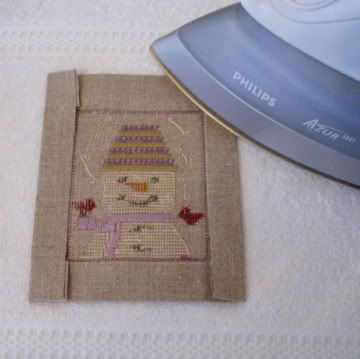
Step 4. Cut Iron On Vilene/fusible Interfacing to exact size of the now ironed stitched piece.
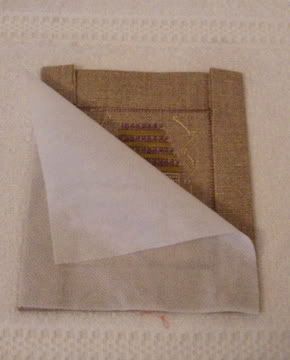
Step 5. On REVERSE side shown above now iron vilene/interfacing on as per manufacturers instructions to fuse to the back of stitched piece.
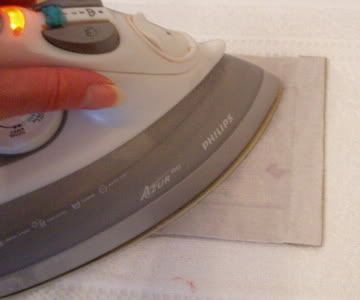
Section 2
PREPARING THE BACKING FABRIC
Step 6. We now start the backing fabric measure and fold sides in like this by 'finger' pressing.
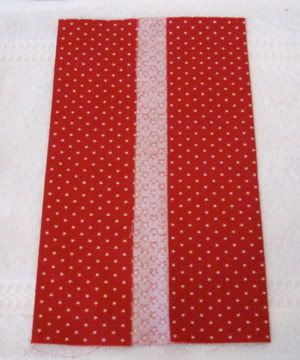
Step 7. Try the stitched design on top for size, like this below, measure distances accurately, remove stitched piece then iron backing fabric into place. (Use steam setting if you have it to get really sharp lines)
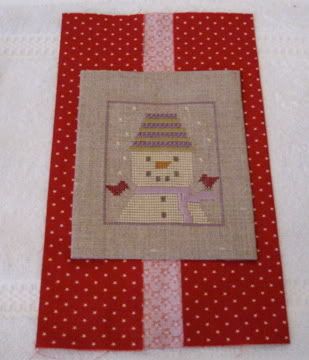
Step 8. Making sure after measuring that the stitched piece is correctly centred, hold into place with a couple of pins pushed in vertically. We are now going to turn the top over like this, measuring to use about one third of the fabric for the 1 st turnover then 'finger' press into place like so...
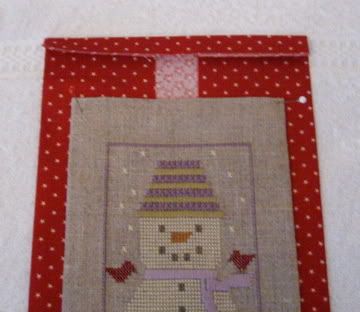
Step 9. We are now going to use another third and turn the top over again making sure it sits over the top of the stitched piece like so
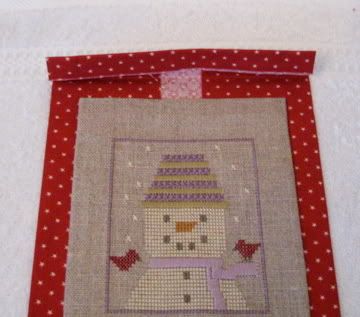
Step 10. Now we know everything is lined up properly, press it into place being careful not to iron over your stitching.
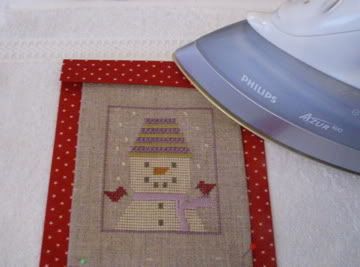
Step 11. We now do exactly the same for the bottom section following steps 8 to 10 above. It will now look like this below.
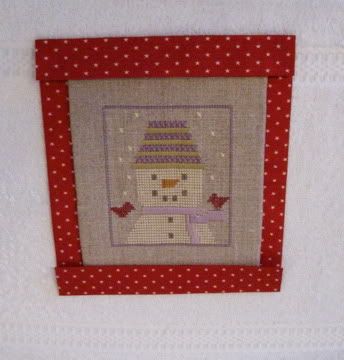
Step 12. If your prepared stitched piece is quite light you may not need to do this step. Mine was a very thick heavy linen and the backing fabric needed more strength to hold it firm. Judge yourself if there seems a big weight difference in the 2 prepared sections. If yours does need strengthening to keep it firm we are now going to repeat Step 4 for the iron on Vilene/fusible interfacing to be exact size of now ironed backing fabric piece. This time though we will open up the ironed backing fabric , line up the Vilene/Interfacing within the ironed outline and again as per manufacturers instructions iron it into place on WRONG side BEING VERY CAREFUL NOT TO PRESS OUT YOUR CAREFULLY IRONED IN LINES. The backing fabric now looks like this below once you have folded in the top, bottom and sides again.
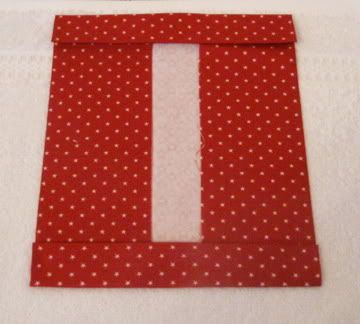
Section 3
CORDING PREPARATION
Step 13. Take your length of cording and knot a loop in it a little way along. This will form the hanger, centre it in the middle top then take the remaining cording round snugly to fit in under the flap.
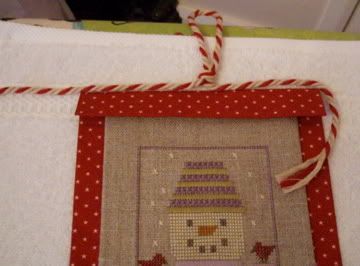
Step 14. Do the same with the other side of cording long length. Once in position cut it off from the main long length, leaving it just slightly longer than exact. If you untwist a small bit of the cording you can take a little section to make a small knot to hold it when it hangs with the weight from it. (Only use a little bit of cording from each side to knot, or it will be too bulky). Those of you who can/want to sew, can oversew the pieces of cording together. I tried doing nothing but it just fell out of mine with the weight once I hung it up :/
OR: Maybe a better way?...You can always do it way of the bottom instruction below (Step 15) but leave the ends long enough to knot at the top to form the hanger.
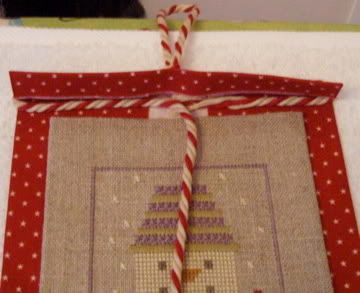
Step 15. We are going to do the bottom now but the other way around by placing the cording under the flap first then bringing it around to the bottom of the fabric.
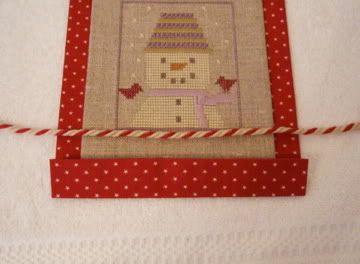
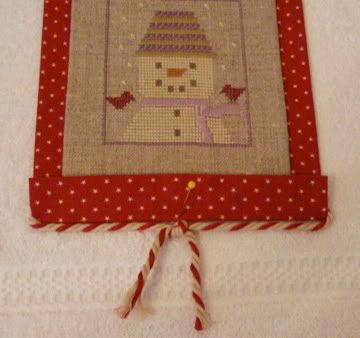
Step 16. Tie at the bottom in a knot, it will have maybe untwisted a bit itself. No worries, we will come to that later :)
Section 4
FINAL FINISHING
Step 17. We are on the last leg now of fixing it all together, all the careful preparation will pay off :) We are now going to cut the strips of Iron on Wonderweb / Fusible web / Hemming Tape. Very carefully and accurately cut the strips the exact length and width of the sides of the STITCHED piece as shown here. So you end up with 4 pieces clockwise all round the edge...one each side and top & bottom.
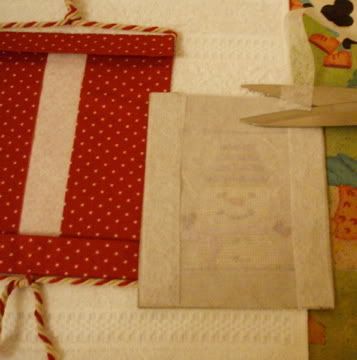
Step 18. Very carefully to make sure all the web / tape is accuarately lined up turn it all over and place it on the top of the backing piece. Once correctly centred vertically pin it into place to hold...the big moment is coming up as you will now follow the manufacturers instructions and fuse it into place with your iron :) It will now look like this below.
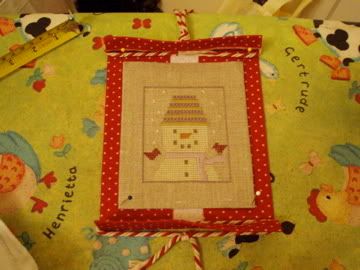
Step 19. This is the last step and we are going to fuse the overlap flap with the web / tape to form a sealed casing. Again cut the strips exactly the right width, of the flap this time. Make sure the cording is correctly in place top and bottom then push the flap down/up repectively and iron again as per manufacturers instructions. This will attach the top and bottom sections to the stitched piece . Separate to unravel the bottom ends of the twisted cording to form a tassel, trim if necessary to make it look neater.
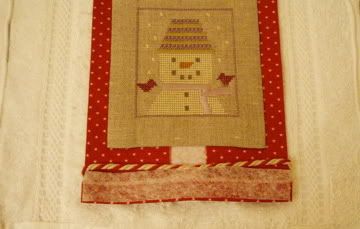
Those of you who can or like to sew can of course do so invisibly right round the whole edges.
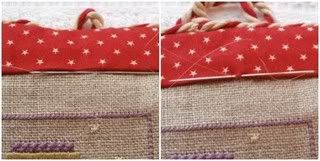
Which ever way you prefer VOILA we have our finished wallhanging :)
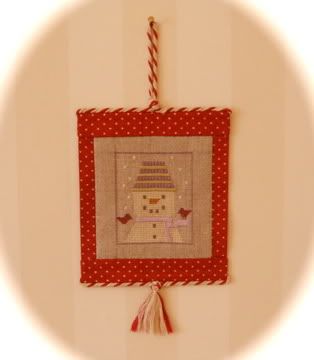
I hope you have understood and enjoyed my class for you all, if you take part and finish one please post a picture to the blog as remember this is a communal blog , here for us all to enjoy. You will need to register for a Wordpress account which really only means register a user name and your email, then email Karen for the invite link to join so you can post, it is as easy as that :)
Tutor = Helen
Friday, June 8, 2007
No Sew Wallhanging Class - Materials List
Hello to Everyone,
This month is the NO SEW Wallhanging class it will run NEXT weekend 16th - 17th June.
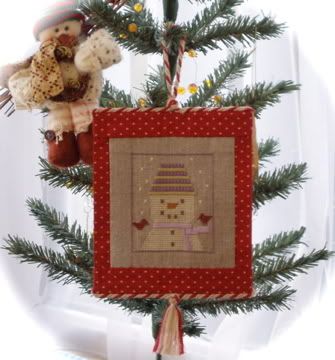
This REALLY is just the easiest finish with absolutely no sewing...so anybody afraid of finishing or who can't sew can have a go at this one with no fears at all :)
The Materials List is as follows:
1. Your Stitched piece any small size design will do, I stitched a cross-stitch border around my stitched area for easiness in finishing. With linen trimmed to within 2 inches or 5 cm of stitched area border ( we will leave a generous allowance that can always be reduced if needed)
2. A fabric square 6 inches or 16cm bigger than stitched piece on all sides. I used a cotton fabric for my backing.
3. 1 yard or 1 metre of cording, I used shop bought but you can make your own co-ordinating twisted cording. You can also use ribbon instead, if you prefer to.
4. 4 buttons which are optional for each corner.
5. Fusible Interfacing / Iron on Vilene enough for both stitched piece and your backing fabric.
6. Wonderweb / Fusible Web / Iron on Hemming Tape.
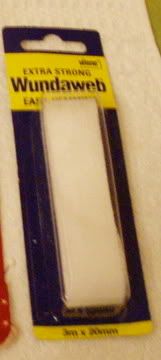
The tools required are:
1. Ironing Board.
2. Iron.
3. Clean towel for pressing on ironing board.
4. Scissors or Shears.
5. Pins.
6. A tapemeasure or a ruler for precise measuring.
This really must be one of the easiest, fun, fast, finishing projects and absolutely anyone will definately be able to do this without any worries. Even without any prior finishing skills, you will be able to do this :) So stitch a wee design at the ready, gather your supplies and come and join in next weekend, you will be glad you did :)
Helen
This month is the NO SEW Wallhanging class it will run NEXT weekend 16th - 17th June.

This REALLY is just the easiest finish with absolutely no sewing...so anybody afraid of finishing or who can't sew can have a go at this one with no fears at all :)
The Materials List is as follows:
1. Your Stitched piece any small size design will do, I stitched a cross-stitch border around my stitched area for easiness in finishing. With linen trimmed to within 2 inches or 5 cm of stitched area border ( we will leave a generous allowance that can always be reduced if needed)
2. A fabric square 6 inches or 16cm bigger than stitched piece on all sides. I used a cotton fabric for my backing.
3. 1 yard or 1 metre of cording, I used shop bought but you can make your own co-ordinating twisted cording. You can also use ribbon instead, if you prefer to.
4. 4 buttons which are optional for each corner.
5. Fusible Interfacing / Iron on Vilene enough for both stitched piece and your backing fabric.
6. Wonderweb / Fusible Web / Iron on Hemming Tape.

The tools required are:
1. Ironing Board.
2. Iron.
3. Clean towel for pressing on ironing board.
4. Scissors or Shears.
5. Pins.
6. A tapemeasure or a ruler for precise measuring.
This really must be one of the easiest, fun, fast, finishing projects and absolutely anyone will definately be able to do this without any worries. Even without any prior finishing skills, you will be able to do this :) So stitch a wee design at the ready, gather your supplies and come and join in next weekend, you will be glad you did :)
Helen
Tuesday, June 5, 2007
New tutorial - wallhanging
Tutorials page has been updated with a link to a patchwork wallhanging tutorial created by Heather Lott. The well-illustrated instructions are very clear and run over 3 separate pages.
Posted by KarenV
Posted by KarenV
Sunday, June 3, 2007
Gallery - mischief managed
Today I managed to finish two projects that have been sitting in my drawer for over a year. Yikes! Where does the time go, anyway? (All images are clickable for greater detail.)
First up is a design by The Sampler Girl. This is part of her former Saturday series and I stitched it for Niek for Valentine's Day (2006!). I've finished it as a bag. Not that I can actually picture Niek using it - LOL! - but because the design lent itself so well to it. (Note that the rather bizarre color scheme is my choice, not what the design calls for.)
Then there is this sweet little freebie from The Prairie Schooler that I made for one of my aunts over two years ago. How embarassing is that? She's a serious seamstress, so in addition to this being a pincushion it is also magnetic on the underside to quickly clear up any pin spills. I know whenever I pull my sewing machine out, I have to spill my pins at least once.
Thanks Karen and Anne for setting these FAL weekends up - I still have another half dozen small designs that need to be finish-finished, and maybe now there's hope!
Posted by BarbaraCL
Gallery - Just squeaked one in...
I stitched up this little freebie by Midsummer Night Designs in the week and decided to finish it as a mattress pincushion:
Posted by KarenV
(pics are clickable)
I totally copied Helen's idea of threading ribbon around the edge rather than using pins - thanks for the inspiration Helen! :)
Posted by KarenV
Saturday, June 2, 2007
Gallery - A flower with heart - Lucialoo's June FAL weekend
Today I finished this little needle holder for a friend's birthday. As I'm quite sure she's not comming here, I can show it to you right now ;-)
I chose to stitch 2 little hearts from Corinne Rigaudeau. It is the same heart, more or less stitched and with my friends initials and my initials.
When you open it, it becomes a lovely flower where you can put your needles.
It was not very easy to sew curved, but I'm really pleased with the result. I hope my friend will like it as well.
Posted by Lucialoo
Subscribe to:
Posts (Atom)
